How to defeat the Imurah and Chaos Demon final boss in Warhammer 40K: Space Marine 2

The final boss in Warhammer 40K: Space Marine 2 is a rematch with Imurah, but he's brought a friend with him. A portal to the Warp has been opened, and thanks to it, a Chaos Demon can join this fight at full strength. After besting Imurah earlier on in the Warhammer 40K: Space Marine 2 campaign, I thought the second battle with him would be tough but pretty much the same. I couldn't have been more wrong, because this bos fight features the biggest foe you'll directly fight in the game, a Chaos Demon of epic proportions. So not only do you need to defeat a Chaos sorcerer, but you've got to do it while taking a hammering from an ancient god-like creature. How to defeat the Imurah and Chaos Demon final boss in Warhammer 40K: Space Marine 2Screenshot by DestructoidThe first part of the fight against Imurah and the Chaos Demon in Warhammer 40K: Space Marine 2 will see you fight it out against the Chaos Space Marine. He's pretty tricky to hit because he darts and teleports around the arena. He also has a habit of summoning Thousand Suns into the arena, whom you'll need to dispatch pretty fast if you don't want to get overwhelmed. After you've damaged Imurah enough, he'll teleport Titus to a dark realm. There is no ammo or health here. It's just a place where you must defend yourself from attacks from Imurah. After a few successful parries, you'll be transported back to the arena, but now a Chaos Demon will show up. Screenshot by DestructoidThis Chaos Demon has a few different attacks that you can't do anything about. You've got to dodge than and make it through each phase to fight Imurah once more. The attacks I saw included multiple black holes opening and firing balls of electricity, an attack with walls of light that rush toward you, and an attack where the Chaos Demon slams its spear to generate a shockwave that you must dodge through. Screenshot by DestructoidTowards the end of the fight, the Chaos Demon will appear with a glowing red eye and start causing the arena to explode under your feet. You must shoot the red eye until it's damaged enough that the Chaos Demon retreats to stop this attack and move into the next phase. Imurah will become more aggressive with every phase of the fight. He's going to get up close and personal, so don't be afraid to use your Special Tactics to hit him with a few overpowered melee attacks of your own for massive damage. I found that parrying was the best approach for this section of the fight. If you dodge, Imurah just pull out a red attack that you can't block or parry. By parrying his blue attacks, you prevent Imurah from firing off red ones and get a few cheeky countershots in on him, too. Screenshot by DestructoidFinally, after a brutal fight, Imurah will transport you and your team to the same location as Calgar. This dark place isn't dangerous. You've just got to walk through it. Shoot the Thousand Suns who appear to turn them to dust. Every sorcerer you encounter will be killed by Calgar as he approaches them. The ending of Warhammer 40K: Space Marine 2 will play out after you reach the glowing light, and it's glorious. There's so much to take in, so skip through the credits if you don't want to watch all of them, and get to the good stuff at the end. The post How to defeat the Imurah and Chaos Demon final boss in Warhammer 40K: Space Marine 2 appeared first on Destructoid.

featured-image

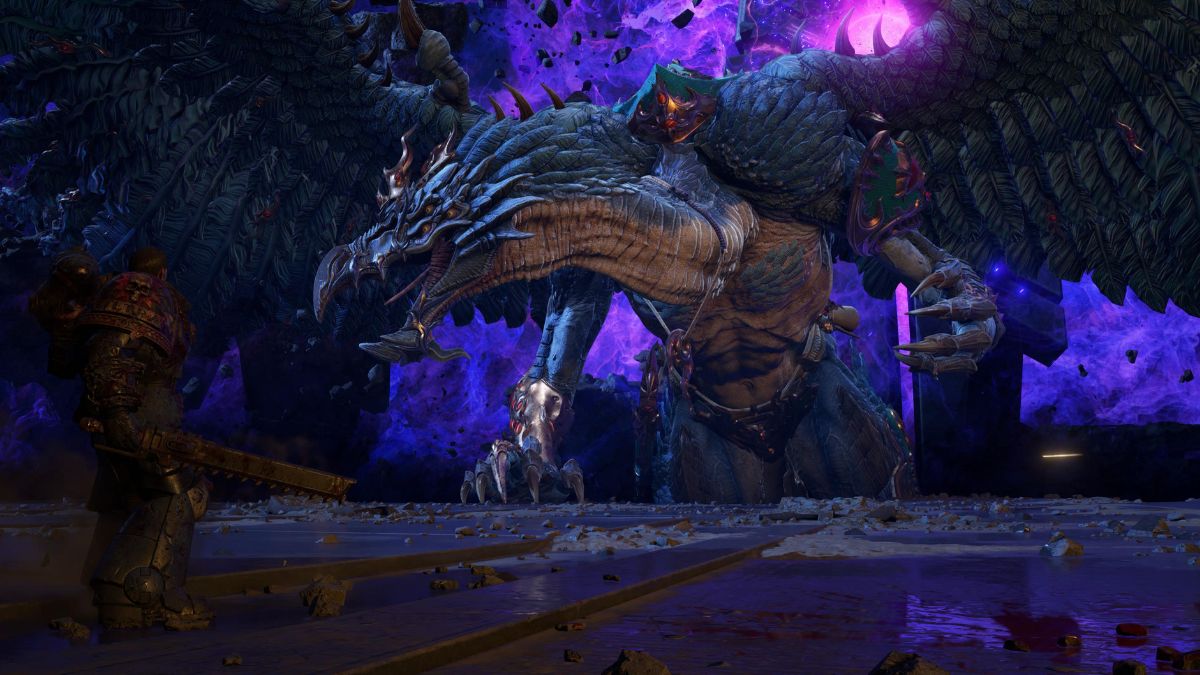
The final boss in is a rematch with Imurah, but he’s brought a friend with him. A portal to the Warp has been opened, and thanks to it, a Chaos Demon can join this fight at full strength. After earlier on in the campaign, I thought the second battle with him would be tough but pretty much the same.

I couldn’t have been more wrong, because this bos fight features the biggest foe you’ll directly fight in the game, a Chaos Demon of epic proportions. So not only do you need to defeat a Chaos sorcerer, but you’ve got to do it while taking a hammering from an ancient god-like creature. How to defeat the Imurah and Chaos Demon final boss in The first part of the fight against Imurah and the Chaos Demon in will see you fight it out against the Chaos Space Marine.


He’s pretty tricky to hit because he darts and teleports around the arena. He also has a habit of summoning Thousand Suns into the arena, whom you’ll need to dispatch pretty fast if you don’t want to get overwhelmed. After you’ve damaged Imurah enough, he’ll teleport Titus to a dark realm.

There is no ammo or health here. It’s just a place where you must defend yourself from attacks from Imurah. After a few successful parries, you’ll be transported back to the arena, but now a Chaos Demon will show up.

This Chaos Demon has a few different attacks that you can’t do anything about. You’ve got to dodge than and make it through each phase to fight Imurah once more. The attacks I saw included multiple black holes opening and firing balls of electricity, an attack with walls of light that rush toward you, and an attack where the Chaos Demon slams its spear to generate a shockwave that you must dodge through.

Towards the end of the fight, the Chaos Demon will appear with a glowing red eye and start causing the arena to explode under your feet. You must shoot the red eye until it’s damaged enough that the Chaos Demon retreats to stop this attack and move into the next phase. Imurah will become more aggressive with every phase of the fight.

He’s going to get up close and personal, so don’t be afraid to use your Special Tactics to hit him with a few overpowered melee attacks of your own for massive damage. I found that parrying was the best approach for this section of the fight. If you dodge, Imurah just pull out a red attack that you can’t block or parry.

By parrying his blue attacks, you prevent Imurah from firing off red ones and get a few cheeky countershots in on him, too. Finally, after a brutal fight, Imurah will transport you and your team to the same location as Calgar. This dark place isn’t dangerous.

You’ve just got to walk through it. Shoot the Thousand Suns who appear to turn them to dust. Every sorcerer you encounter will be killed by Calgar as he approaches them.

The ending of will play out after you reach the glowing light, and it’s glorious. There’s so much to take in, so skip through the credits if you don’t want to watch all of them, and get to the good stuff at the end..